Developer Guide
- Setting up, getting started
- Design
- Implementation
- Documentation, logging, testing, configuration, dev-ops
- Appendix: Requirements
- Appendix: Instructions for manual testing
- Delete command
- Appendix: Effort
Setting up, getting started
Refer to the guide Setting up and getting started.
Design
Architecture

The Architecture Diagram given above explains the high-level design of the App. Given below is a quick overview of each component.
.puml files used to create diagrams in this document can be found in the diagrams folder. Refer to the PlantUML Tutorial at se-edu/guides to learn how to create and edit diagrams.
Main has two classes called Main and MainApp. It is responsible for,
- At app launch: Initializes the components in the correct sequence, and connects them up with each other.
- At shut down: Shuts down the components and invokes cleanup methods where necessary.
Commons represents a collection of classes used by multiple other components.
The rest of the App consists of four components.
-
UI: The UI of the App. -
Logic: The command executor. -
Model: Holds the data of the App in memory. -
Storage: Reads data from, and writes data to, the hard disk.
Each of the four components,
- defines its API in an
interfacewith the same name as the Component. - exposes its functionality using a concrete
{Component Name}Managerclass (which implements the corresponding APIinterfacementioned in the previous point).
For example, the Logic component (see the class diagram given below) defines its API in the Logic.java interface and exposes its functionality using the LogicManager.java class which implements the Logic interface.

How the architecture components interact with each other
The Sequence Diagram below shows how the components interact with each other for the scenario where the user issues the command delete 1.

The sections below give more details of each component.
UI component

API :
Ui.java
The UI consists of a MainWindow that is made up of parts e.g.CommandBox, ResultDisplay, PersonListPanel,
EventListPanel, StatusBarFooter etc. All these, including the MainWindow, inherit from the abstract UiPart
class.
The UI component uses JavaFx UI framework. The layout of these UI parts are defined in matching .fxml files that are in the src/main/resources/view folder. For example, the layout of the MainWindow is specified in MainWindow.fxml
The UI component,
- Executes user commands using the
Logiccomponent. - Listens for changes to
Modeldata so that the UI can be updated with the modified data.
Logic component

API :
Logic.java
-
Logicuses theAddressBookParserclass to parse the user command. - This results in a
Commandobject which is executed by theLogicManager. - The command execution can affect the
Model(e.g. adding a person). - The result of the command execution is encapsulated as a
CommandResultobject which is passed back to theUi. - In addition, the
CommandResultobject can also instruct theUito perform certain actions, such as displaying help to the user.
Given below is the Sequence Diagram for interactions within the Logic component for the execute("delete 1") API call.

DeleteCommandParser should end at the destroy marker (X) but due to a limitation of PlantUML, the lifeline reaches the end of diagram.
Model component

API : Model.java
The Model,
- stores a
UserPrefobject that represents the user’s preferences. - stores the address book data.
- stores the event book data.
- exposes an unmodifiable
ObservableList<Person>that can be ‘observed’ e.g. the UI can be bound to this list so that the UI automatically updates when the data in the list change. - exposes an unmodifiable
ObservableList<Event>that can be ‘observed’ e.g. the UI can be bound to this list so that the UI automatically updates when the data in the list change. - does not depend on any of the other three components.
Storage component

API : Storage.java
The Storage component,
- can save
UserPrefobjects in json format and read it back. - can save the address book data in json format and read it back.
- can save the event book data in json format and read it back.
Common classes
Classes used by multiple components are in the seedu.partyplanet.commons package.
Implementation
This section describes some noteworthy details on how certain features are implemented.
[Feature] Help
This feature allows users to quickly get help displayed in the GUI regarding the available commands and their syntax. An additional optional parameter can be used to specify a particular command for more detailed help regarding that command. This minimizes the need for the user to cross reference material outside of the application, for example the User Guide.
Implementation
When called as help, the user will be shown SHOWING_HELP_MESSAGE, a concise command-line syntax of all implemented commands and their arguments following the conventions listed in https://developers.google.com/style/code-syntax
This is facilitated by MESSAGE_USAGE_CONCISE in each Command that the user is able to use.
When called as help [COMMAND], the user will be given the detailed description of the usage of the specified COMMAND.
This is facilitated by MESSAGE_USAGE in each Command.
Given below is an example usage scenario and how the HelpCommand mechanism behaves at each step.
Step 1. The user launches the application for the first time. The user is unsure of the syntax and attempts to type
in the CLI a command that is unlikely to fit the syntax of implemented commands. AddressBookParser#ParseCommand() throws a ParseException and the user receives a prompt “Unknown command, try the command: help”.
Step 2. The user executes help. AddressBookParser#ParseCommand() instantiates a HelpCommandParser to parse the arguments for help. Since there are no arguments, the default constructor for HelpCommand is called, and the user receives a concise description of the complete set of implemented commands.
Step 3. The user executes help add. AddressBookParser#ParseCommand() instantiates a HelpCommandParser to parse the arguments for help add. The constructor taking in a commandWord is called, and when HelpCommand#execute is run, the MESSAGE_USAGE of the Command matching the commandWord is shown to the user.
help is called instead. If multiple arguments are found, only the first one is parsed.
Design consideration:
Aspect: How HelpCommand executes
-
Alternative 1 (current choice): Entire help message is composed of
MESSAGE_USAGE_CONCISEof the various commands inSHOWING_HELP_MESSAGE, which is printed.- Pros: Each
Commandtakes care of its own syntax, only needs to be updated at one place for changes to take effect. - Cons: The list of commands is still hard coded into
SHOWING_HELP_MESSAGE, and needs to be manually updated every time a newCommandis implemented.
- Pros: Each
-
Alternative 2: Maintain a list of Commands, which
HelpCommandwill iterate over to print the concise syntax for each command when printing the help message.- Pros: Need not hard code the possible commands, only have to update the list of commands
- Cons: Possible reduced performance, especially later if a large number of commands is added.
[Feature] Undo/redo
This feature allows users to correct mistakes when using PartyPlanet. Only commands which alter the state of the address or event book, such as add or edelete can be undone or redone. list cannot be undone or redone as it does not change the state of the address or event book.
Implementation
The undo/redo mechanism is facilitated by StateHistory and State. It extends PartyPlanet with an undo/redo history, stored internally as an ArrayList<State> with a currentStatePointer, where a State stores the AddressBook and EventBook at any given point in time. Additionally, it implements the following operations:
-
StateHistory#addState()— Saves the current book state in its history. -
StateHistory#previousState()— Restores the previous state from its history. -
StateHistory#nextState()— Restores a previously undone state from its history.
These operations are exposed in the Model interface as Model#addState(), Model#undo() and Model#redo() respectively.
Given below is an example usage scenario and how the undo/redo mechanism behaves at each step.
Step 1. The user launches the application for the first time. The StateHistory will be initialized with the initial address and event book state, and the currentStatePointer pointing to that single State.

Step 2. The user executes delete 5 command to delete the 5th person in the address book. The delete command calls Model#addState(), causing the modified state of the address book after the delete 5 command executes to be saved in a new State, which is stored in StateHistory, and the currentStatePointer is shifted to the newly inserted State.

Step 3. The user executes add -n David to add a new person. The add command also calls Model#addState(), causing another State to be saved into the StateHistory.

Model#addState(), so the state will not be saved into the StateHistory.
Step 4. The user now decides that adding the person was a mistake, and decides to undo that action by executing the undo command. The undo command will call Model#undo(), which will shift the currentStatePointer once to the left, pointing it to the previous state, and restores the address and event books to that state.

currentStatePointer is at index 0, pointing to the initial state, then there are no previous states to restore. The Model#undo() command catches an IndexOutOfBoundsException thrown by StateHistory#previousState() if this is the case. If so, it will return an error to the user rather than attempting to perform the undo.
The following sequence diagram shows how the undo operation works:

UndoCommand should end at the destroy marker (X) but due to a limitation of PlantUML, the lifeline reaches the end of diagram.
The redo command does the opposite — it calls Model#redo(), which shifts the currentStatePointer once to the right, pointing to the previously undone state, and restores the address and event books to that state.
currentStatePointer is at the last index, pointing to the latest state, then there are no undone states to restore. The Model#redo() command catches an IndexOutOfBoundsException thrown by StateHistory#nextState() if this is the case. If so, it will return an error to the user rather than attempting to perform the redo.
Step 5. The user then decides to execute the command list. Commands that do not modify the address book, such as list, will usually not call Model#addState(), Model#undo() or Model#redo(). Thus, the StateHistory remains unchanged.

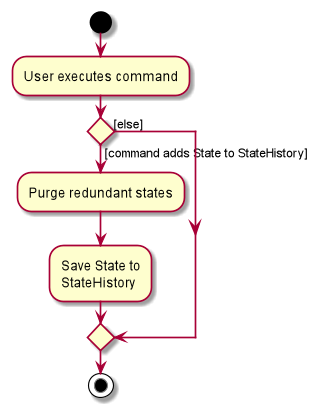
Step 6. The user executes delete, which calls Model#addState(). Since the currentStatePointer is not pointing at the end of the StateHistory, all address book states after the currentStatePointer will be purged. Reason: It no longer makes sense to redo the add -n David command. This is the behavior that most modern desktop applications follow.

The following activity diagram summarizes what happens when a user executes a new command:
Design consideration:
Aspect: How undo & redo executes
-
Alternative 1 (current choice): Saves the entire address and event books.
- Pros: Easy to implement.
- Cons: May have performance issues in terms of memory usage.
-
Alternative 2: Individual command knows how to undo/redo by
itself.
- Pros: Will use less memory (e.g. for
delete, just save the person being deleted). - Cons: We must ensure that the implementation of each individual command are correct.
- Pros: Will use less memory (e.g. for
[Feature] Adding Persons
The Persons stored inside PartyPlanet should not have any compulsory fields except for name. This is to allow for addition of contacts where the user is unable to, or does not need to fill up all fields.
One example of such case is a vendor’s contact. The user does not need to store information on a vendor’s birthday.
Additionally, the user should also be able to store remarks for that contact.
Implementation
- The remark is a new class that stores a String containing the specific remark
- Each
Personclass contains fieldsName,Address,Phone,Birthday,Email,TagandRemark- To allow for optional fields
Address,Phone,Birthday,Email,TagandRemark, each class has an attributeisEmptythat indicates whether the field in the person is empty. - The empty fields will then be stored as an empty string
""in theaddressbook.jsonfolder and be read as an empty field accordingly.
- To allow for optional fields
- Syntax for adding Person:
add -n NAME [-a ADDRESS] [-p PHONE] [-b BIRTHDAY] [-e EMAIL] [-t TAG]... [-r REMARK]
Given below is an example usage scenario and how the add mechanism behaves at each step.
- The user executes
add -n James -r Loves sweetscommand to add a person with nameJamesand remarkLoves sweets, represented byexecute("add -n James -r Loves sweets"). Note that fieldsAddress,Phone,Birthday,TagandEmailare not specified and hence are empty fields. -
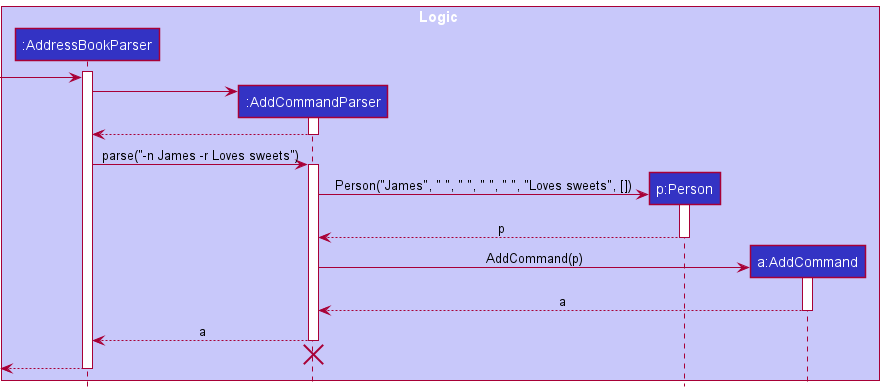
LogicManageruses theAddressBookParserclass to parse the user command, represented byparseCommand("add -n James -r Loves sweets")Below is the partial sequence diagram for steps 1 and 2.

-
AddressBookParsercreates anAddCommandParserwhich is used to parse the arguments provided by the user. This is represented byparse("-n James -r Loves sweets"). -
AddCommandParsercalls the constructor of aPersonwith the given arguments as input and creates aPersonThis is represented byPerson("James", "", "", "", "", "Loves sweets", []). Note empty string""and[]represent empty fields. -
The
AddCommandParserthen passes this newly createdPersonas input to create anAddCommandwhich will be returned to theLogicManager. This is represented byAddCommand(p)Below is the partial sequence diagram for steps 3, 4 and 5.
-
The
LogicManagerexecutes theAddCommandby callingAddCommand#execute()and passes theCommandResultback to theUI.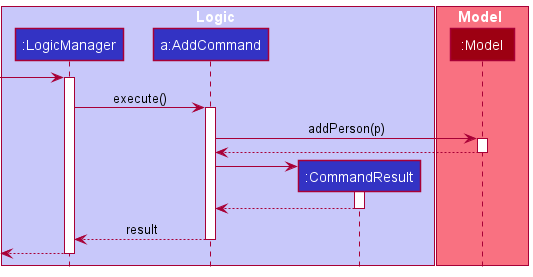
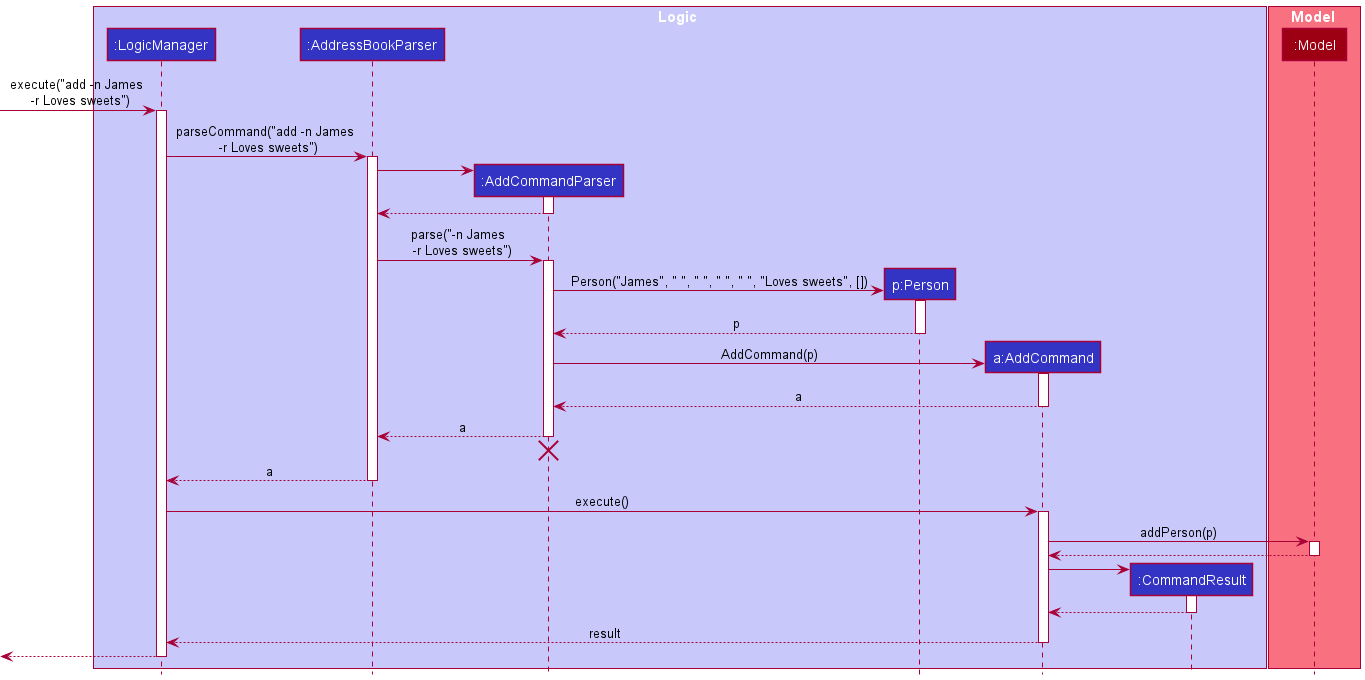
Given below is the full Sequence Diagram for interactions within the Logic component for the execute("add -n James -r Loves sweets") API call.
[Feature] Editing Persons
Information about a person can change over time, and the user can edit contacts without having to delete and add a new replacement.
Edit allows modification of any target field and thus requires just one input parameter to work. The updated contact is then displayed in-place of the old one.
Coupled with flag --remove, edit can remove all specified tags from all contacts in displayed list.
Implementation
-
Syntax for editing individual Persons:
edit INDEX [-n NAME] [-a ADDRESS] [-p PHONE] [-b BIRTHDAY] [-e EMAIL] [-t TAG]... [-r REMARK] -
Syntax for removing tags for all Persons in displayed list:
edit --remove -t TAG [-t TAG]...
Given below is an example usage scenario and how the edit mechanism behaves.
-
The user executes
edit --remove -t friends -t pilotcommand to edit all persons withfriendsand/ orpilottags by removing it from their list of tags. -
LogicManagercallsparseCommand("edit --remove -t friends -t pilot")ofAddressBookParserto parse this user command. -
AddressBookParserrecognises the command wordeditand creates anEditCommandParser. -
AddressBookParsercallsparse("--remove -t friends -t pilot")ofEditCommandParser. -
EditCommandParserdetects flag--removeand callsparseTags(argMultimap.getAllValues(PREFIX_TAG))ofParserUtilto processes the input tags into aSet<Tag>. -
EditCommandParserthen passes thisSet<Tag>as input to create anEditToRemoveTagCommandwhich is returned to theLogicManager. -
LogicManagerexecutes theEditToRemoveTagCommandby callingexecute(model). -
EditToRemoveTagCommandloops through the set of tags and persons in displayed list to remove thefriendsandpilottags from each person in the displayed list. -
EditToRemoveTagCommandcreates aCommandResultwith the success output message and returns it toLogicManager.
Given below is the full Sequence Diagram for interactions for the edit --remove -t friends -t pilot API call.

[Feature] Marking Event as Done
This feature allows Event to be marked as done. Helps user to easily keep track of what events have been completed.
In the display, done Event will include a tick to represent completion.
Implementation
- Syntax for EDoneCommand:
edone INDEX [INDEX]... - Modification to
Eventclass- New attribute
isDoneto represent a done and not done event. - A
setDone()method to return a newEventobject that is done. - A
getStatus()method that returns a tick if theEventis done (for UI display).
- New attribute
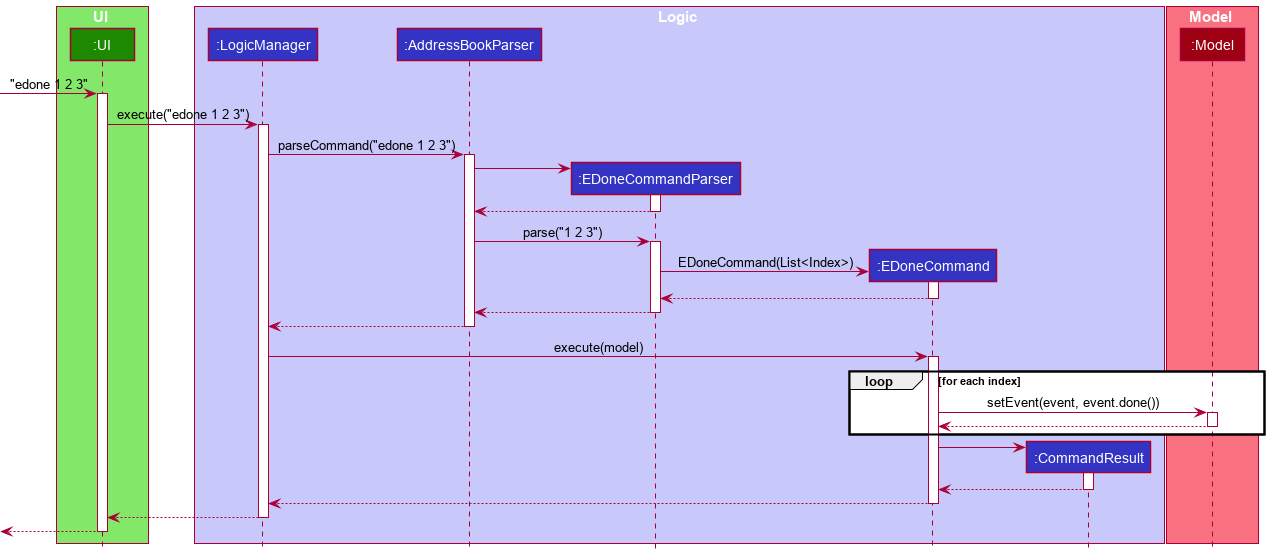
Given below is an example usage scenario and how edone will work.
-
The user executes
edone 1 2 3command to mark event at index 1, 2 and 3 as done. -
LogicManagercallsparseCommand("edone 1 2 3")ofAddressBookParserto parse the input. -
AddressBookParserdetects command wordedoneand creates anEDoneCommandParser. -
AddressBookParsercallsparse("1 2 3")ofEDoneCommandParser. -
EDoneCommandParserprocesses the input and compiles the valid indexes into a listList<Index>. -
EDoneCommandParsercreates anEDoneCommand(List<Index>)and returns it toLogicManager. -
LogicMangerexecutes theEDoneCommand. -
EDoneCommandloops through the list of index, and set the events, at the given index, as a done event. -
EDoneCommandcreates aCommandResultcontaining the output message and returns it toLogicManager.
Given below is the full Sequence Diagram for interactions for the execute("edone 1 2 3") API call.
[Feature] Autocompleting Edit and EEdit Command
Editing the details of Persons and Events is a tedious job due to the user requiring to retype the majority of the detail for a small change.
The autocomplete feature allows the user to quickly autocomplete details from the Person or Event according to the prefixes specified.
Implementation
- Syntax for Autocomplete:
{edit | eedit} INDEX [PREFIXES...]+ TAB - See User Guide for list of available prefixes for each command.
- The user is expected to keypress the TAB key after typing the command in order to activate the autocomplete feature.
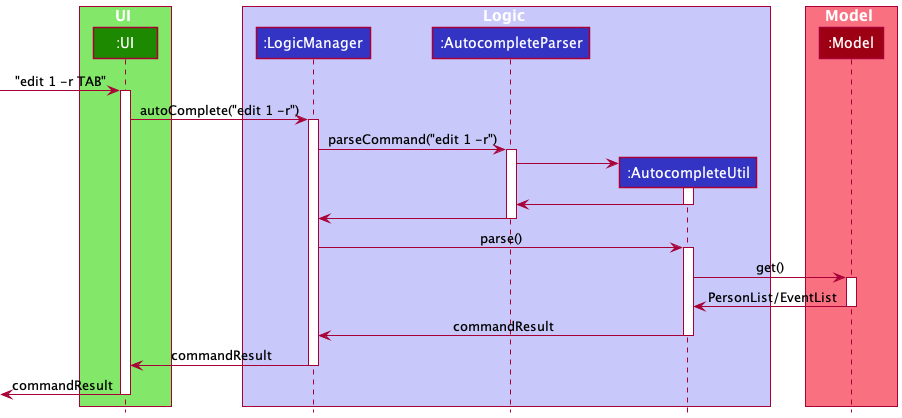
Given below is an example usage scenario and how Autocomplete will work.
-
The user executes
edit 1 -r+ TAB command to autocompletePerson1’s Remark. -
UIcallsautocomplete("edit 1 -r")ofLogicManagerto handle the input. -
LogicManagercallsparseCommand("edit 1 -r")ofAutocompleteParserto parse the input. This returns anAutocompleteUtil. -
LogicManagecallsparse(model)ofAutocompleteUtilwhich processes the input and retrieves the relevantPerson’s details from theModel. -
AutocompleteUtilcreates the autocompleted output String (commandResult) and returns it toLogicManager. -
LogicMangerreturns thecommandResulttoUI. -
UIupdatesCommandBoxto reflect thecommandResult.
Given below is the full Sequence Diagram for interactions for the edit 1 -r + TAB API call.
[Feature] Themes
The customization of themes is a feature within the application, which allows users to select their preferred theme as well as store their theme preferences for subsequent use.
Implementation
The theme selection is primarily enabled by the Theme enumeration.
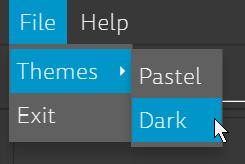
The selection of themes can be triggered via three alternative mechanisms:
-
Upon application start up.
-
Via the specific theme selection from within the menu bar.
-
Via the singular
themecommand which toggles between themes.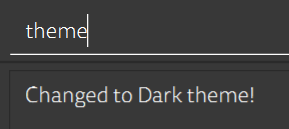
The setTheme method within MainWindow is directly responsible for modifying the look-and-feel of the user interface,
achieved by replacing the stylesheets associated with the requested theme. This method is indirectly exposed to the user
in the GUI as menu options, in the form of the respective setTheme[THEME_NAME] event handlers.
This is also the process by which the theme is initialized upon application start up.
The implementation of the theme change command is a little trickier, since the command itself does not directly interface with the UI. The process by which message passing of the theme change is described below:
-
The user executes the
themecommand, which first retrieves the currently applied theme via theModelinterface. More specifically, this theme is retrieved directly from the application’sGuiSettingsobject, which is exposed via theModel#getGuiSettingsmethod. -
The
themecommand returns aCommandResultobject that stores the desiredThemeenumeration. This object is passed via theLogicinterface back intoMainWindow#executeCommand. which in turn processes theThemevia thesetThememethod as specified above. Both steps 1 and 2 are illustrated below: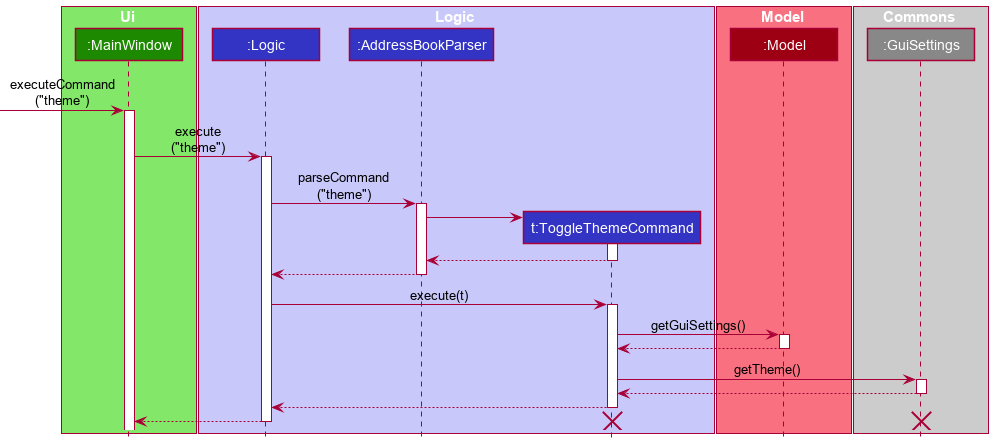
-
The
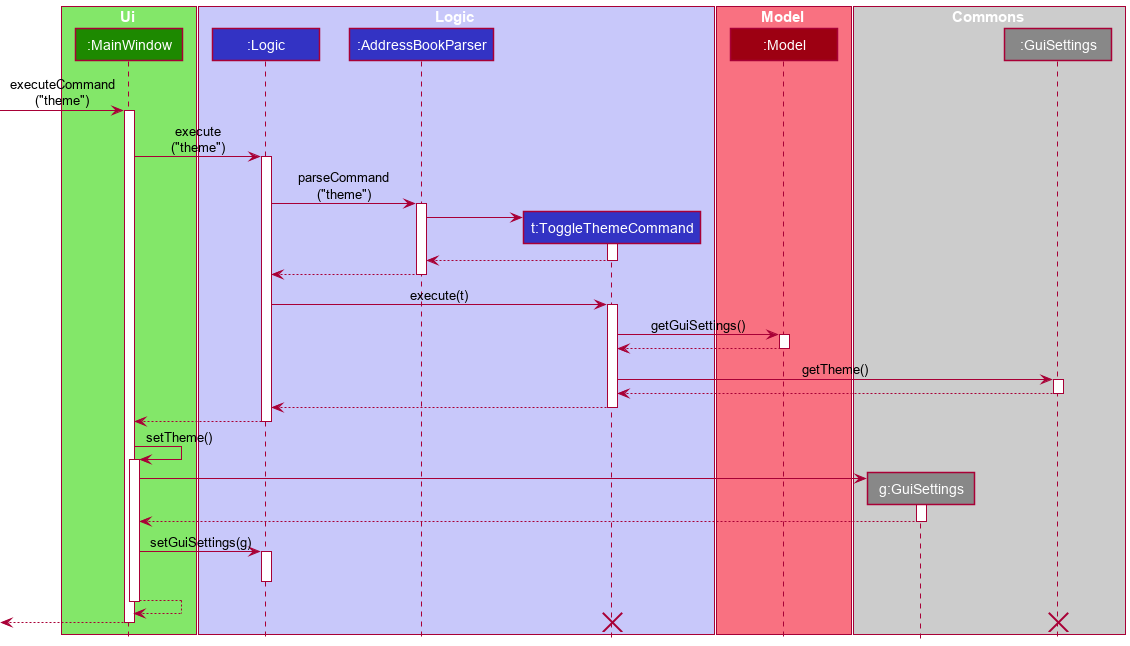
Themeencapsulated in theCommandResultis then passed intosetTheme. A replacementGuiSettingsobject is created byLogicusing the updated theme, and stored for subsequent retrieval (in step 1). This is shown below:
Notably, since GuiSettings is a common resource shared between the Logic and Model objects, this allows
ToggleThemeCommand and MainWindow to access GuiSettings from different contexts without
breaking the interface abstraction barrier.
The following sequence diagram summarizes the theme command execution:
Design considerations:
Saving of user preferences
When interfacing with the application, users typically decide on a single preferred theme and solely use
that theme throughout the bulk of application usage. To facilitate ease of use, the theme selected by the user is
automatically saved as part of the application GUI preferences, which will be loaded upon subsequent application
start up. This responsibility is offloaded to GuiSettings and its respective storage handler.
Different methods of changing theme
In a typical GUI, the activation of specific themes via the menu bar is desirable, since users do not need to repeatedly call the same command to switch between themes. This is especially so for GUIs with a relatively larger number of themes. The second method via the command line is primarily to fulfill the typing accessibility requirement.
This however does have the associated disadvantage of requiring a corresponding setTheme[THEME_NAME] command
for every theme made available through the menu bar. For situations where the number of themes is exceedingly large,
a possible design decision is to filter selected themes to be added to the GUI, while hiding the rest within the
theme toggle command.
Extensibility of themes
The theme functionality is designed to be modular, so that new themes can be easily added.
To add a new theme, adhere to the following steps:
-
Create a new
[THEME_NAME]Theme.cssfile under thesrc/main/resources/view/directory, and populate it with the desired styling. If more styling rules are desired, feel free to separate them into multiple CSS files in the same directory. -
Add a new
Themeenumeration value, and return the list of CSS files associated with the enumeration under theTheme#getStyleSheetsmethod. -
To enable selection of the new theme using
themecommand, add a new entry for the theme inToggleThemeCommand#executefound within thelogic.commandspackage. -
To enable selection of theme via menu bar, in
MainWindowfrom theuipackage, define a newsetTheme[THEME_NAME]FXML event handler callingMainWindow#setThememethod with this new enumeration. Additionally, in theMainWindowFXML itself, define a newMenuItemwith the text[THEME_NAME]and register the aforementioned event handler.
Documentation, logging, testing, configuration, dev-ops
Appendix: Requirements
Product scope
Target user profile:
- has a need to manage a significant number of contacts within CCA
- has a need to keep track of all the birthdays of CCA members to plan celebrations
- has a need to store contacts of favourite vendors to contact for birthday celebrations
- prefer desktop apps over other types
- can type fast
- prefers typing to mouse interactions
- is reasonably comfortable using CLI apps
Value proposition:
- manage planning of birthdays faster than a typical mouse/GUI driven app
- group and access CCA members by information such as matriculation batch/sub-committees
- track upcoming birthdays to plan for
User stories
Priorities: High (must have) - ***, Medium (nice to have) - **, Low (unlikely to have) - *
| Priority | As a … | I want to … | So that I can… |
|---|---|---|---|
*** |
Potential user | See the app populated with sample data | See how the app will look like when it is in use |
*** |
New user | Purge all current data | Get rid of sample data used for exploring the app |
*** |
New user | Record birthdays | Keep track of birthdays of CCA members |
** |
New user | Add contacts without specifying all fields | Only store important fields that I need to know |
** |
New user | Add contacts tagged to a subcommittee | Easily organise members in CCA |
*** |
New user | Add vendors tagged to a particular product/service | Easily look for vendors providing a particular service |
*** |
New user | Edit existing details tagged to a person | Append new information without retyping the same details |
*** |
New user | View a help page / use a help command | Know the correct syntax to use the functions/ know what functions the app supports |
*** |
New user | Add remarks to a person | Take note of their preferences (dietary, allergy, etc) |
** |
Returning user | Sort / search through contacts based on tags | Easily find groups of relevant contacts / members |
* |
Returning user | Sort / search through contacts based on birthday month | Plan mass celebration for everyone born in the same month |
*** |
Returning user | Change the details of a birthday plan | Reflect the changed plans |
** |
Returning user | Delete all members belonging to a group | Reduce clutter and prepare for incoming batches of members |
* |
Returning user | Encrypt application access as well as application data | Protect inadvertent data leak |
* |
Returning user | Mark celebrations as completed | Know which birthdays are done |
** |
Returning user | Delete completed/irrelevant contacts | Reduce the clutter on PartyPlanet |
*** |
Retiring welfare IC | Pass down the data to successor | (they) would not need to re-gather and re-enter details |
* |
Expert user | Create shortcuts | Run multiple repeated commands at once to save time |
** |
Clumsy user | Edit misspelled commands | Fix typo mistakes in the app |
** |
Clumsy user | Undo/edit misspelled names/numbers/notes | Fix mistakes |
* |
Reflective user | Archive past birthday celebrations | Revisit previous birthday celebration and their details for reuse |
* |
CCA welfare IC with many sub-groups | Color tags | Differentiate contacts easily |
** |
Welfare IC who plans ahead of time | Search date | See all birthdays on that day |
** |
Night owl | Enable dark mode | Use the app safely in dark environments |
* |
Overworked welfare IC | See all upcoming birthdays as a weekly view / monthly calendar | Prioritize birthdays to plan |
* |
Satisfied user | Share the application with my family and friends | Encourage close contacts to use the application |
*** |
Returning user | Delete events | Reduce clutter on PartyPlanet |
*** |
Welfare IC | Add a birthday plan (event) to the app | Keep track of the celebration planning progress |
** |
Welfare IC | Add an event without specifying all fields | Only store important fields that I need to know |
*** |
Welfare IC | Set a date for a birthday plan (event) | Ensure details are planned on time |
** |
Busy Welfare IC | Sort through the list of events | Look at upcoming events |
* |
Busy Welfare IC | Search for events by details | Find similar events to refer to for planning |
** |
Busy Welfare IC | Search for events by title | Filter out particular events with that title |
** |
Expert User | Retrieve recent inputs | Save time when using similar command multiple times |
** |
Returning User | Delete multiple entries at one go | Efficiently remove multiple contacts from the app |
Use cases
(For all use cases below, the System is the PartyPlanet application while the Actor is the User,
unless specified otherwise)
Use case: UC1 - Add a contact
MSS:
  1. User requests to add a new contact.
  2. PartyPlanet displays the new list of contacts with the added contact.
  Use case ends.
Extensions:
  1a. PartyPlanet detects an erroneous input (UC11).
  Use case ends.


Use case: UC2 - Delete a contact
MSS:
  1. User requests for a contact/contacts to be deleted.
  2. PartyPlanet displays the list of contacts without the deleted contact.
  Use case ends.
Extensions:
  1a. PartyPlanet detects an erroneous input (UC11).
  Use case ends.


Use case: UC3 - Edit a contact
MSS:
  1. User request for a contact/contacts to be edited.
  2. PartyPlanet displays the updated details.
  Use case ends.
Extensions:
  1a. PartyPlanet detects an erroneous input (UC11).
  Use case ends.


Use case: UC4 - List contacts
MSS:
  1. User requests to list out all contacts.
  2. PartyPlanet displays a list of all contacts.
  Use case ends.
Extensions:
  1a. User chooses a sort order from a list of possible sort orders.
      1a1. PartyPlanet displays the list of all contacts in the
           given sort order.
      Use case ends.
  1b. User chooses a searching criteria from a list of possible criteria.
      1b1. PartyPlanet displays the list of all contacts meeting the
           given criteria.
      Use case ends.
  1c. PartyPlanet detects an erroneous input (UC11).
  Use case ends.


Use case: UC5 - Add an event
MSS:
  1. User requests to add a new event.
  2. PartyPlanet displays the new list of events with the added event.
  Use case ends.
Extensions:
  1a. PartyPlanet detects an erroneous input (UC11).
  Use case ends.


Use case: UC6 - Delete an event
MSS:
  1. User requests for an event/events to be deleted.
  2. PartyPlanet displays the list of events without the deleted event.
  Use case ends.
Extensions:
  1a. PartyPlanet detects an erroneous input (UC11).
  Use case ends.


Use case: UC7 - Edit an event
MSS:
  1. User requests for an event to be edited.
  2. PartyPlanet displays the updated details.
  Use case ends.
Extensions:
  1a. PartyPlanet detects an erroneous input (UC11).
  Use case ends.


Use case: UC8 - Mark an event as done
MSS:
  1. User requests for an event to be marked as done.
  2. PartyPlanet displays the updated status.
  Use case ends.
Extensions:
  1a. PartyPlanet detects an erroneous input (UC11).
  Use case ends.


Use case: UC9 - List events
MSS:
  1. User requests to list out all events.
  2. PartyPlanet displays a list of all events.
  Use case ends.
Extensions:
  1a. User chooses a sort order from a list of possible sort orders.
      1a1. PartyPlanet displays the list of all events in the given sort
           order.
      Use case ends.
  1b. User chooses a searching criteria from a list of possible criteria.
      1b1. PartyPlanet displays the list of all events meeting the
           given criteria.
      Use case ends.
  1c. PartyPlanet detects an erroneous input (UC11).
  Use case ends.


Use case: UC10 - Get Help
MSS:
  1. User requests for help.
  2. PartyPlanet displays all available commands.
  Use case ends.
Extensions:
  1a. User supplied a specific command as a parameter.
      1a1. PartyPlanet displays help for the specific command supplied.
      Use case ends.
  1b. PartyPlanet detects an erroneous input (UC11).
  Use case ends.


Use case: UC11 - Erroneous input
MSS:
  1. PartyPlanet detects erroneous input.
  2. PartyPlanet displays error message.
  Use case ends.


Use case: UC12 - Exit PartyPlanet
MSS:
  1. User requests to exit.
  2. PartyPlanet exits and closes the window.
  Use case ends.


Use case: UC13 - Undo an action
MSS:
  1. User requests to undo an action.
  2. PartyPlanet displays the details of the action that was undone and
     the list of contacts/events after the action is undone.
  Use case ends.
Extensions:
  1a. PartyPlanet detects an erroneous input (UC11).
  Use case ends.


Use case: UC14 - Redo an action
MSS:
  1. User requests to redo an action.
  2. PartyPlanet displays the details of the action that was redone and
     the list of contacts/events after the action is redone.
  Use case ends.
Extensions:
  1a. PartyPlanet detects an erroneous input (UC11).
  Use case ends.
Non-Functional Requirements
- PartyPlanet should be usable by a novice who has never used a CLI address book before.
- PartyPlanet should work on any mainstream OS with minimally Java
11installed. - PartyPlanet Should be able to hold up to 1000 contacts without a noticeable sluggishness in performance for typical usage.
- PartyPlanet should store data locally only, in a human editable text file, for privacy reasons.
- PartyPlanet should only be for a single user and should not require interaction with other users of PartyPlanet.
- A user with above average typing speed for regular English text (i.e. not code, not system admin commands) should be able to accomplish most of the tasks faster using commands than using the mouse.
- The source code should be open source.
- PartyPlanet should work without requiring an installer, the installation of any additional software, or any external connections.
- The total file size should not exceed 100MB.
Glossary
- Mainstream OS: Windows, Linux, Unix, OS-X
Appendix: Instructions for manual testing
Given below are instructions to test the app manually.
Launch and shutdown
-
Initial launch
-
Download the jar file and copy into an empty folder
-
Double-click the jar file Expected: Shows the GUI with a set of sample contacts and events. The window size may not be optimum.
-
-
Saving window preferences
-
Resize the window to an optimum size. Move the window to a different location. Close the window.
-
Re-launch the app by double-clicking the jar file.
Expected: The most recent window size and location is retained.
-
Add command
-
What: Add in new contact into the application. All fields are optional except name.
Command:add -n bobby -r Past EXCO member
Expected message:New person added: bobby; Remark: Past EXCO member -
What: If name is not specified, an error will be thrown.
Command:add -r nameless
Expected message:Invalid command format! ...
Delete command
-
What: delete everyone in filtered list
Command:delete
Expected Message:Deleted the following person(s): ... -
What: delete first and second person
Command:delete 1 2
Expected Message:Deleted the following person(s): ... -
What: Wrong format (not a valid index)
Command:delete -1
Expected Message:Invalid command format! ... -
What: Wrong format (index does not exist in the list)
Command:delete 10000
Expected Message:None of the indexes provided are valid -
What: Index larger than maximum integer value
Command:delete 123456789123456789
Expected Message:Invalid command format! ... -
What: Delete all contacts that has
choirANDyear2tag
Command:delete -t choir -t year2
Expected Message:Deleted the following person(s): ... -
What: Delete all contacts that has
choirORyear2tag
Command:delete --any -t choir -t year2
Expected Message:Deleted the following person(s): ... -
What: Invalid tag
Command:delete -t @
Expected Message:Tags names should be alphanumeric and should not be longer than 40 characters
Edit command
-
What: Edit the address of a contact in the application.
Command:edit 1 -a NUS Temasek Hall Block E
Expected:Edited Person: Alex Yeoh; Phone: 87438807; Email: ... -
What: If index is out of bounds.
Command:edit 9999 -a NUS Temasek Hall Block E
Expected Message:The person index provided is invalid -
What: Remove a tag from all contacts in the application.
Command:edit --remove -t year4
Expected Message:Removed tag from: ...
List command
Lists contacts in the application. Used for 2 functions: Searching and Sorting.
-
What: List all contacts
Command:list
Expected message:Listed all persons! ... -
What: Search on partial criteria (case-insensitive), match all. (name contains
land tag containschoir)
Command:list -n l -t choir
Expected message:3 person(s) listed! Each person meets all requirements stated. ... -
What: Search on exact criteria (case-insensitive), match any. (name is
Alex Yeohor contains tagyear2)
Command:list --exact --any -n Alex Yeoh -t year2
Expected message:2 person(s) listed! Each person meets at least 1 requirement stated. ... -
What: Sort list by upcoming birthday. (Ignores year)
Command:list -s u
Expected message:Listed all persons! Sorted by upcoming birthdays. ... -
What: Sort list by descending name. (Case insensitive)
Command:list -s n -o d
Expected message:Listed all persons! Sorted names in descending order. ...
Note: Default sort isnameand default order isascending
EAdd command
-
What: Add in new event into the application. All fields are optional except name.
Command:eadd -n party -r invite people
Expected message:New event added: party; Remark: invite people -
What: If name is not specified, an error will be thrown.
Command:eadd -r nameless
Expected message:Invalid command format! ...
EDelete command
-
What: delete all event in filtered list
Command:edelete
Expected Message:Deleted the following event(s): ... -
What: delete first and second event
Command:edelete 1 2
Expected Message:Deleted the following event(s): ... -
What: Wrong format (not a valid index)
Command:edelete -1
Expected Message:Invalid command format! ... -
What: Wrong format (index does not exist in the list)
Command:edelete 10000
Expected Message:None of the indexes provided are valid
EEdit command
Eedit
-
What: Edit the date of an event in the application.
Command:eedit 1 -d 25 Dec 2021
Expected:Edited event: Jan celebration; Date: 25 Dec 2021 ... -
What: If date does not have a year.
Command:eedit 1 -d 25 Dec
Expected Message:Event date must contain a year
EDone command
-
What: mark first and second event as done
Command:edone 1 2
Expected Message:Event(s) marked as completed: ... -
What: mark first and second event as done (second event already completed)
Command:edone 1 2
Expected Message:Event(s) marked as completed: ... Invalid/Already completed event index(es): ... -
What: Wrong format (not a valid index)
Command:edone -1
Expected Message:Invalid command format! ... -
What: Wrong format (index does not exist in the list)
Command:edone 10000
Expected Message:All indexes provided are either invalid or references events that are already completed
EList command
Lists events in the application. Used for 2 functions: Searching and Sorting.
-
What: List all events
Command:elist
Expected message:Listed all events! -
What: Search on partial criteria (case-insensitive), match all. (name contains
land remark containspeople)
Command:elist -n l -r people
Expected message:3 event(s) listed! Each event meets all requirements stated. ... -
What: Search on exact criteria (case-insensitive), match any. (name is
Christmas celebrationor remark is10 people)
Command:elist --exact --any -n Christmas celebration -r 10 people
Expected message:2 event(s) listed! Each event meets at least 1 requirement stated. ... -
What: Sort list by upcoming event date. (Full date including year)
Command:elist -s u
Expected message:Listed all events! Sorted by upcoming event dates. -
What: Sort list by descending event name. (Case insensitive)
Command:elist -s n -o d
Expected message:Listed all events! Sorted event names in descending order.
Note: Default sort isnameand default order isascending
Undo command
-
What: To undo the last action
Command:undo
Expected Message:Completed undo for the change: ... -
What: If there are no more actions to undo
Command:undo
Expected Message:There's nothing left to undo!
Redo command
-
What: To redo the last action undone
Command:redo
Expected Message:Completed redo for the change: ... -
What: If there is no more actions to redo
Command:redo
Expected Message:There's nothing left to redo!
ToggleTheme command
- What: Toggle between dark and pastel theme
Command:theme
Expected Message:Changed to ... theme!
Exit command
- What: exits the app
Command:exit
Expected Message: NA
Appendix: Effort
The effort put into PartyPlanet was larger than the effort required to implement AB3.
Difficulties and Challenges
The Difficulty level of implementing PartyPlanet was high, owing mainly to two reasons:
-
Refactoring the command set
The previous command set had several redundancies. We thus refactored the entire command set to be more concise, cohesive and disjoint, condensing all the operations into the essentialadd,edit,deleteandlist(along with the event book equivalents) to support a more streamlined and consistent workflow. In order to create this new and improved command set, we had to think about which commands would facilitate a fast workflow for users. After determining the 4 main commands, we had to craft optional tags to these commands, to fine tune the effects of the command. -
Implementing and integrating the event book
The difficulty of implementing the event book is self-explanatory. Beyond that, we also had to integrate it properly and cohesively with the existing address book, so that PartyPlanet would feel like a refined product. This integration is facilitated by having both books appear on the same GUI, allowing users to easily cross reference the details of the CCA members or vendors, and then add planning remarks to the events being planned.
Achievements of the project
-
Concise, cohesive command set: The 4 main commands
add,edit,deleteandlist(and the event book equivalents) all have non-overlapping and clear roles, which streamlines a user’s workflow. Furthermore, the added options help fine tune the commands, augmenting the user-friendliness of our command set. Once a user is used to the command set and its additional options, this will facilitate effective and efficient party planning. -
Cohesive product: The address book and event books complement each other well, and offer users the ability to gather relevant details easily to plan for a celebration.
-
User friendly extras to streamline workflow: From prompts when a command syntax is not recognized, to
undoandredocommands for the occasional wrong command, the time taken for a user to correct any mistake made is minimized. PartyPlanet also provides keyboard shortcuts forundoandredo, and it includes an input history, accessed with the UP and DOWN arrow keys, for users to quickly use commands with a high degree of similarity. Finally, PartyPlanet has an autocomplete feature that helps users with editing the details of Persons and Events to reduce retyping majority of the details for a small change.